
The expansion valve is a critical component in any HVAC (Heating, Ventilation, and Air Conditioning) system, controlling the amount of refrigerant entering the evaporator, thereby influencing the system’s cooling performance. Whether you are upgrading your HVAC system or replacing a malfunctioning valve, proper installation is essential for efficient operation and longevity. In this guide, we'll walk through the steps involved in installing an expansion valve in your HVAC system.
Important Note: Installing an expansion valve requires technical knowledge of HVAC systems. If you are not a trained professional, it’s recommended to seek assistance from a licensed technician to avoid system damage or personal injury.
Tools and Materials Needed:
- New expansion valve (specific to your HVAC system model)
- Adjustable wrenches
- Refrigerant pressure gauge
- Screwdrivers (flathead and Phillips)
- Tubing cutter or pipe wrench
- Leak detection solution or electronic leak detector
- Insulation tape or wrap
- Safety goggles and gloves
- HVAC system manual (for reference)
1. Turn Off the Power: Start by turning off the power supply to the HVAC system. This will prevent any electrical accidents or damage to the components during the installation process.
2. Recover the Refrigerant: Use a refrigerant recovery machine to safely remove the refrigerant from the system. This is essential to comply with environmental regulations and to avoid damage to the HVAC components when opening the system.
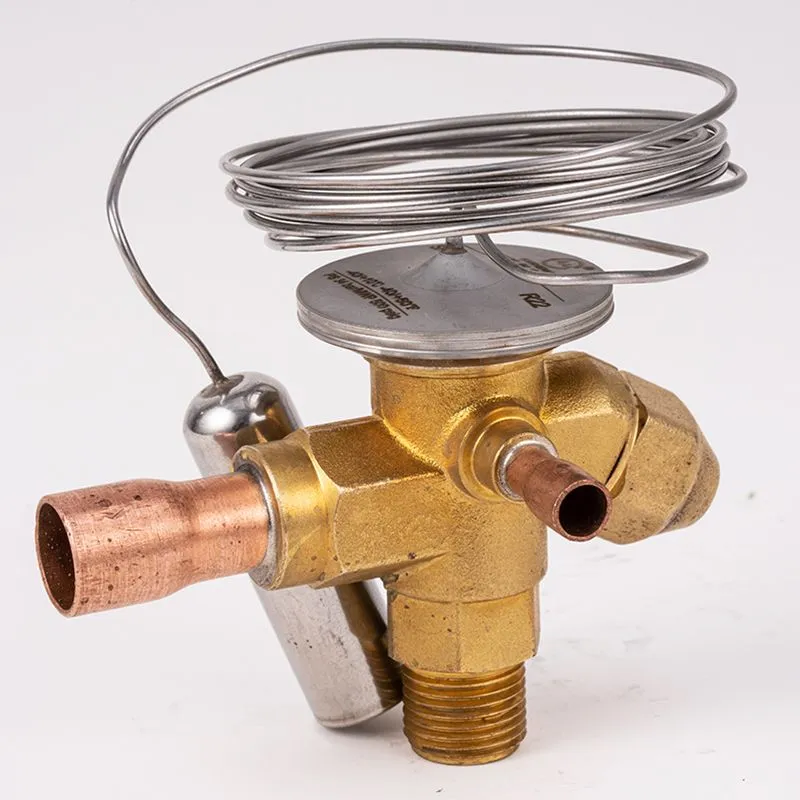
3. Access the Expansion Valve: Locate the expansion valve in your HVAC system. It’s typically found near the evaporator coil. To access it, you may need to remove the system’s protective cover or panels.
4. Wear Protective Gear: Put on safety goggles and gloves to protect yourself from refrigerant exposure and sharp edges in the system.
1. Disconnect Refrigerant Lines: Use an adjustable wrench or pipe cutter to disconnect the refrigerant lines connected to the old expansion valve. Make sure to release any remaining pressure carefully.
2. Remove the Sensor Bulb: If your expansion valve has a sensor bulb, disconnect it from the suction line. The sensor bulb should be mounted on the suction line with a clamp or strap.
3. Unscrew the Expansion Valve: Use a wrench to carefully unscrew and remove the old expansion valve. Be mindful not to damage the surrounding pipes or components.
1. Attach the New Valve: Position the new expansion valve in place and screw it onto the refrigerant lines. Make sure all connections are tight and secure to prevent leaks.
2. Reconnect the Sensor Bulb: If the new valve has a sensor bulb, position it in the same location as the old one. Ensure it is in good thermal contact with the suction line and wrap it with insulation tape to secure it. Proper placement is crucial for accurate temperature readings.
3. Reattach Refrigerant Lines: Carefully reattach the refrigerant lines to the new valve. Use a wrench to tighten all connections, but avoid overtightening as this can damage the threads or cause leaks.
4. Check for Leaks: Apply a leak detection solution or use an electronic leak detector around all connection points to check for leaks. If bubbles form, it indicates a leak, and the connections should be tightened further.
1. Vacuum the System: Before recharging the refrigerant, connect a vacuum pump to the service valves and evacuate the system to remove any moisture or air. This step ensures that the system operates efficiently and prevents contamination.
2. Recharge with Refrigerant: Connect a refrigerant cylinder to the system and recharge the refrigerant according to the manufacturer’s specifications. Use a refrigerant pressure gauge to monitor and adjust the pressure levels as needed.
3. Monitor the System: After recharging, turn on the HVAC system and let it run. Monitor the pressures and temperatures to ensure the expansion valve is operating correctly. Adjustments may be needed to optimize the flow of refrigerant.
1. Check System Performance: Let the system run for some time and check the temperature of the air coming from the vents. Ensure that the cooling performance is consistent and that there are no abnormal noises or pressure fluctuations.
2. Seal and Insulate: Once you are satisfied with the operation, seal any openings with insulation wrap or tape to prevent air or refrigerant leaks.
3. Reassemble the Panels: Reattach any panels or covers you removed to access the expansion valve. Ensure all screws and fasteners are securely tightened.
4. Conduct a Final Leak Test: Perform one last leak test around the newly installed valve to ensure no refrigerant is escaping.
Tips for Successful Installation:
- Choose the Right Valve: Ensure that the replacement valve is compatible with your HVAC system’s specifications.
- Follow Manufacturer Guidelines: Always refer to the HVAC system’s manual for specific installation instructions and refrigerant charge recommendations.
- Handle Refrigerant with Care: Always recover and recharge refrigerant using appropriate equipment to avoid environmental harm and system damage.
While it’s possible to install an expansion valve yourself, HVAC systems are complex, and improper installation can lead to system damage, inefficient operation, or even injury. If you’re unsure of any step or lack the necessary tools, it’s advisable to consult a licensed HVAC technician for assistance.
By following these steps and guidelines, you can successfully install an expansion valve in your HVAC system, ensuring it runs smoothly and efficiently for years to come.
Sanheng is a professional Expansion Valve manufacturer and supplier in China, known for its excellent service and reasonable prices. As a factory, we can produce high-quality Expansion Valve. We have our own factory.If you are interested, please contact trade@nbsanheng.com.


